Lappia Mahara is a program that is used as an extension to Lappia Moodle. It adds functionality that Moodle cannot offer properly. Moodle is a course-based VLE. That means that it is built up around course environments and it is the courses that unite the users. Mahara is user-oriented. That means that it is built around users and their profiles and their uploaded files, blog messages and other information. For this reason, Mahara is described as an e-portfolio.
![]() Users can access Lappia Mahara only via Lappia Moodle. There is no separate login required. New users in Mahara will find that their Mahara Profile contains information taken from their Moodle user profile. The Mahara profile can however be extended with resumé data, so as to create an online C.V.
Users can access Lappia Mahara only via Lappia Moodle. There is no separate login required. New users in Mahara will find that their Mahara Profile contains information taken from their Moodle user profile. The Mahara profile can however be extended with resumé data, so as to create an online C.V.
The central part of Mahara is the Portfolio where users can store all files and data that they gather during their studies. The users can organise this information into so-called Views and then decide whom they will give Access to the data in particular Views. Thus they can give a teacher access to assignment files, or give their friends access to some pictures they took during a party.
Mahara allows the easy creation of user Groups that can discuss in a group forum and create group Views, in which they make group files accessible to each other and their teacher(s). A planning tool is available for time management of the group activities.
Mahara is being piloted at Lappia during the spring term of 2011. Teachers can request Mahara access to be made available in selected Moodle courses. After the summer recess Lappia Mahara will be available to all users of Lappia Moodle via their MyMoodle page.

Just to be clear, Mahara is not a replacement for Moodle. It is just an extension that adds functionality. Lappia Moodle users can employ Mahara to store files, links and other data related to their studies. They can also use it for communication and for group work. In the future Moodle and Mahara will be even more closely integrated, so that user can upload files from Mahara straight to Moodle and download data from Moodle to Mahara.
There is every reason to surmise that the Mahara e-portfolio will complete the range of virtual environments on offer at Lappia with its ability to tie together on-line content that users may have dispersed over various online services and its allowing them to share it among themselves in a sense of security.
For more detailed information, please, see the Mahara manual that is part of our Moodle 1.9 Beginner’s Manual.
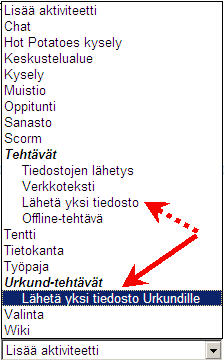 Helpoin tapa käyttää Urkundia on Moodlen kautta. Voit opettajan roolissa asettaa Moodlessa oppimistehtävän tyypiksi Urkund-tehtävän, joka eroaa “tavallisesta” oppimistehtävästä vain siinä, että Moodle lähettää tehtävän Urkundiin tarkistettavaksi ja palautettavaksi 24 tunnin sisällä. Voit avata tulosanalyysin tehtävänpalautuksen arviointisivulta ilman, että sinun tarvitsee erikseen käyttää Urkund-tiliä. Arviointi ja kommentointi tapahtuvat myös kuten Moodlessa normaalistikin.
 By far the easiest way to use Urkund is via the Moodle integration that is available now. The Urkund assignment will see students hand in documents just as in a normal Moodle assignment, but with the difference that the documents will be sent from Moodle to Urkund for processing and that Urkund will send back the result of the analysis to the assignment in Moodle within 24 hours. The teacher can open the analysis report from the assignment’s grade page without needing to access Urkund separately. Grading and commenting is done as in any other Moodle assignment.
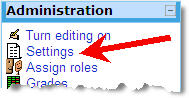 Often we get requests from teachers to add more “content blocks” to their courses, when the course materials are so many that the five default topic sections do not suffice. Topic sections are not added via the course page, but via the course Settings. The link to this important page can be found in the Administration block of your course. Upon clicking the link (one time is enough) you will see the course settings, with which you can control many aspects of your course. The number of topic sections in the course can be set after the text Number of weeks/topics. If you change the number of topic sections, scroll down to the bottom of the Settings page and Save changes.
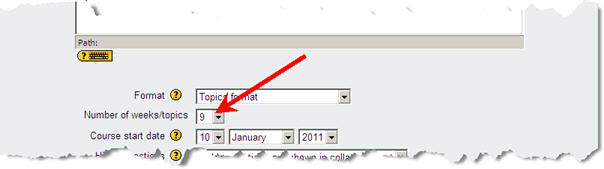
 Do not leave your course without any enrolment key, because that would mean that anyone can enter the course and enrol themselves.