”….aluksi oli vähän hukassa, menkää iLinciin, Moodlessa tehdään sitä ja tätä….enemmän olisi kaivannut neuvoja ja perehdytystä, että miten ja minne”
Yllä olevan kaltaista palautetta kuulee aina joskus, tänäkin syksynä, sekä vasta aloittaneilta että jo kokeneemmiltakin aikuisopiskelijoilta, jotka suorittavat opintojaan suurelta osin etäopiskeluna verkon välityksellä.
Opiskelijalle tulisi syntyä opintojen alussa sekä jokaisen opintojakson alussa selkeä kuva siitä, että mitä opintojaksolla tullaan opiskelemaan, miten ja missä. Mitä-kysymykseen vastaaminen on helppoa, senhän sanoo pääpiirteissään jo OPS. Miten ja missä ovatkin sitten jo vähän haasteellisempia kysymyksiä, jos toteutustapana on muu kuin perinteinen opettajajohtoinen luokkahuoneopetus.
Verkko-opintojaksolla keskiössä on nimenomaan opiskelijan toiminnan suunnittelu – mitä opiskelija tekee saavuttaakseen tavoitteena olevan osaamisen ja vasta tämän jälkeen opettajan (kuinka opettaja ohjaa prosessia, missä vaiheessa, miten jne.) Opiskelijalle olisi annettava tälle oppimisreitille selkeä suunnitelma/”reittikuvaus”, josta käy ilmi, että mitä tehdään missäkin verkkoympäristössä/-välineellä, miksi tehdään, koska tehdään ja kenen kanssa. Opintojakson toteutussuunnitelma toimii tällaisena reittikuvauksena silloin, kun se on hyvin tehty. Sen voi suunnitella myös yhteistyössä opiskelijaryhmän kanssa, kun opiskelijoilla on jo jonkin verran kokemusta verkossa opiskelemisesta.
Kyseessä on siis opintojakson toteutuksen suunnittelu, johon on olemassa monia malleja ja apuvälineitä. Yhtä niistä olen kuvannut viime keväänä täällä. Suunnitelmaa voi konkretisoida esimerkiksi seuraavilla tavoilla: opintojakson toteutuksen eteneminen visuaalisena rakenteena Moodlessa tai sosiaalisessa mediassa. Tai tekstipohjaisena kuvauksena tai jonkinlaisena visuaalisena esityksenä (ks. alla oleva esimerkki).
“Reittioppaan” laatiminen on saadun opiskelijapalautteen mukaan tärkeää. Entistä tärkeämpään rooliin se astuu, kun perinteisten oppimisalustojen ja virtuaaliluokan rinnalla käytetään, mitä moninaisempia sosiaalisen median sovelluksia. Reittioppaan laatimisessa opettajaa auttavat mielellään verkko-opintojen tukihenkilöt, sillä heillä on laaja asiantuntemus eri verkkovälineiden käyttömahdollisuuksista ja –rajoituksista.
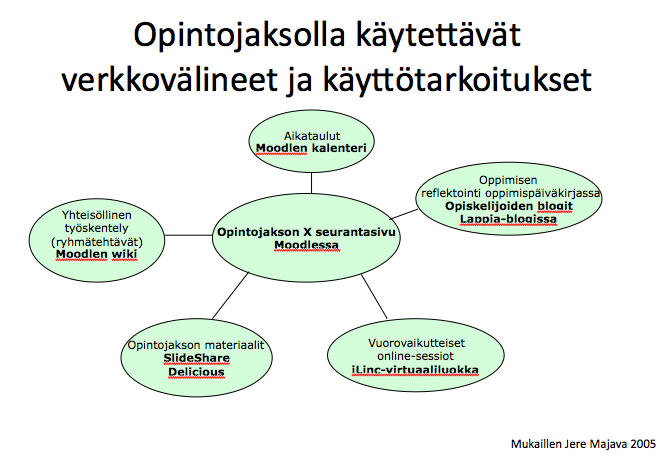
Yksinkertaisimmillaan reittiopas voi näyttää vaikka tältä:
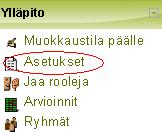
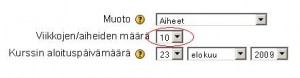
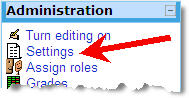 Often we get requests from teachers to add more “content blocks” to their courses, when the course materials are so many that the five default topic sections do not suffice. Topic sections are not added via the course page, but via the course Settings. The link to this important page can be found in the Administration block of your course. Upon clicking the link (one time is enough) you will see the course settings, with which you can control many aspects of your course. The number of topic sections in the course can be set after the text Number of weeks/topics. If you change the number of topic sections, scroll down to the bottom of the Settings page and Save changes.
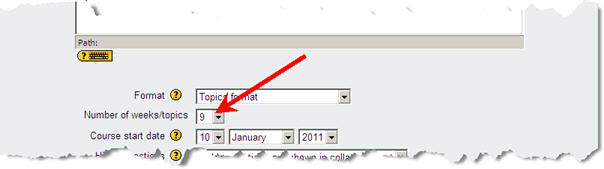
 Do not leave your course without any enrolment key, because that would mean that anyone can enter the course and enrol themselves.