Categories
Moodle tekninen

Puhutko Moodlea? (3) Tehtävät kanssaopiskelijoiden luettavaksi

Yhä useammalla opintojaksolla opettajat haluavat, että opiskelijat palauttavat tehtäviään koko ryhmän luettavaksi. Aina ei kuitenkaan tiedetä, mikä on tällaisten tehtävien palauttamiseen sopivin väline. Se perinteinen tehtävä-työkalu on aina henkilökohtainen, eikä sinne palautettuja tiedostoja voi näyttää koko ryhmälle.

Tietokanta on varsin oivallinen väline tehtäville, jotka palautetaan ryhmän nähtäville ja kenties kommentoitavaksi.

  1. Valitse Lisää aktiviteetti -pudotusvalikosta Tietokanta
  2. Anna tehtävälle nimi ja kirjoita ohjeet Johdanto-tekstialueelle. jos haluat, että opiskelijat kommentoivat toistensa tehtäviä, valitse Kommentit-kohtaan Kyllä.
  3. Valitse Tallenna ja näytä. Seuraavaksi sinulle avautuu sivu, jossa kerrotaan, että tietokantaan ei ole määritelty kenttiä.
  4. Valitse seuraavaksi Mallipohjat-välilehti. Sivulla on pitkä lista valmiita mallipohjia, joita voit vapaasti käyttää.
  5. Jos haluat, että opiskelijat palauttavat tiedostoja, voit valita listalta esim.
    Mallipohjan valinta

Categories
iLinc Moodle pedagoginen

Teacher’s comments on teaching online/ Opettajan kommentit verkko-opetuksesta

eVinkit kirjoitetaan usein kehittäjän näkökulmasta, ohjeiksi opettajille ja muille käyttäjille. Tällä kertaa päästimme ääneen itse opettajan; ja hänen näkökulmastaan kuullaan hyviä ja huonoja puolia verkossa opettamisesta. Paul Nijbakker on eOppimiskeskuksen suunnittelija, joka myös opettaa verkossa.

eVinkki blogs are usually written from the point of view of development, as an advice for the teachers and other users. This time we hear the teacher himself, and his opinion of online-teaching. Paul Nijbakker works as a developer at the eLearnlinc Centre and also teaches online.

Please, check the video (7 min) below 🙂 Katso (7 min) video 🙂

Paul Nijbakker – from Sirpa Kokkonen on Vimeo.

Categories
Moodle pedagoginen

Do you speak Moodle? (2) Link to a file or web site

How well versed are you in the use of our main virtual learning environment? There are certain things in Moodle that every teacher should be able to do by him- or herself. Adding a file to a course and displaying it as a link on the course page is one of those things.

If you start with the file you want to upload, saved in a format that everyone can open without problems (so avoid MS Office 2007 formats, or Open Office formats for the time being), you can make this file available to your students on a Moodle course page in 11 clicks and one text string (The amount of additional clicks and scrolling depends on the organisation of your course and course files). Count with us:

  1. Turn editing on in your course and scroll to the topic section where you want the file to appear.
  2. Click on Add a resource.
  3. Click on Link to a file or web site.
  4. Fill in the link Name (i.e. the text string that will appear on the course page and link to the file) and scroll down a bit.
  5. Click on the Choose or upload file button. (This opens the course Files. If you wish to upload the file to a separate folder that ads a click on the folder. Creating a new folder adds 3 clicks and a text string, i.e. the folder name.)
  6. Click on the Upload a file button.
  7. Click on the Browse button. (This opens a file upload box that looks at a folder in your PC. If it is not the folder where your file is saved, you need to open that folder, which adds about two clicks.)
  8. Click on the file.
  9. Click the Open button.
  10. Click on the Upload this file button. (This uploads the file to the folder in Moodle.)
  11. Click the Choose link behind the file name in the folder in Moodle. (If you use a small browser window, you may have to scroll to the right to see this link.) This adds the file to the location box. Scroll down.
  12. Click the Save and return to course button. (This adds the file as a link to your Moodle course page.)

Presto, twelve steps! This process is illustrated on the corresponding page of our Moodle manual.

The previous installment in this series deals with topic sections and the enrolment key (in the course Settings).

Categories
Moodle pedagoginen

Do you speak Moodle? (1) Topic sections and Enrolment key

Lue viesti suomeksi

How well versed are you in the use of our main virtual learning environment? There are certain things in Moodle that every teacher should be able to do by him- or herself. Managing your course Settings is one of those things.

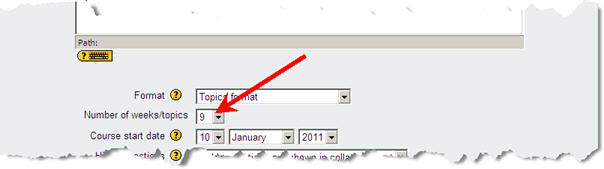
Changing the number of topic sections (course content blocks)

The Settings link in the Administration block
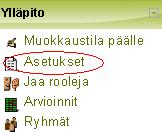
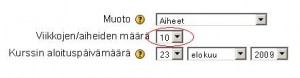
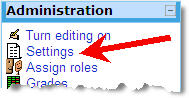
Often we get requests from teachers to add more “content blocks” to their courses, when the course materials are so many that the five default topic sections do not suffice. Topic sections are not added via the course page, but via the course Settings. The link to this important page can be found in the Administration block of your course. Upon clicking the link (one time is enough) you will see the course settings, with which you can control many aspects of your course. The number of topic sections in the course can be set after the text Number of weeks/topics. If you change the number of topic sections, scroll down to the bottom of the Settings page and Save changes.

Set the number of weeks/topicsNote that if you reduce the number of topic sections, the superfluous ones disappear from view, but they still exist, including any course materials linked to those sections.

Checking the enrolment key

The enrolment key is a password that you can give to your students, so that they can enrol themselves in your course. If you do not remember the enrolment key for your course you can find it in the course Settings (further down on the page) under the header Availability. There you can see the enrolment key if you tick the Unmask box. If you do not like the existing enrolment key, you can change it, but remember to scroll down to the bottom of the Settings page and Save changes.

Checking (and changing) the Enrolment keyDo not leave your course without any enrolment key, because that would mean that anyone can enter the course and enrol themselves.

You can learn more about the various course Settings on the corresponding page of our Moodle manual.

The next installment in this series deals with uploaded file resources.

Categories
Moodle

Puhutko Moodlea? (1) Lisää laatikoita ja mikä se avain olikaan?

Read this message in English

Opintojakson edetessä joudutaan useasti siihen tilanteeseen, että kurssilla käytettävän materiaalin määrä kasvaa kasvamistaan. Tähän yhtälöön kun lisätään keskustelualue, erilaisia tehtävien palautuksia ja niin edelleen, voi kurssin etusivu alkaa näyttämään ahdistavan sekavalta. Moodlessa oletuksena näitä ”laatikoita”, tai aiheita, kuten niitä myös voitaisiin kutsua, on oletuksena viisi (5) kappaletta.

Mutta eipä hätä ole tämän näköinen. Näiden laatikoiden määrää voidaan helposti kasvattaa, jolloin materiaalia voidaan jakaa laajemmalle alueelle säilyttäen siisti ulkoasu. Operaatio on varsin simppeli toteuttaa.

Vasemmalla ylläpito– valikossa on asetukset josta saadaan kätevästi lisättyä ”aiheiden/viikkojen” eli tutummin juuri näiden laatikoiden määrää.

Kuvien osoittamien vaiheiden jälkeen meillä on muutamalla klikkauksen jälkeen lisää tilaa. Joka viikolle voidaan lisätä vaikka oma laatikkonsa ja esimerkiksi tehtävien palautuksia varten omansa. Näin kurssiympäristö pysyy selkeänä ja kaikki tarvittava materiaali on helpommin löydettävissä.

Asetukset valikosta löytyy myös paljon muuta mitä opettaja voi tarvita. Monilla opettajilla on meneillään vähintäänkin repullinen eri kursseja, joten ei ole ihme, että esimerkiksi se kurssiavain pääsee unohtumaan. Tämä vaatimaton, mutta sitäkin sisältörikkaampi asetukset valikko tarjoaa ratkaisun myös tähän ongelmaan. Sieltä nimittäin löytyy kohta ”saatavuus” jossa kurssiavain lymyää. Painamalla rasti kohtaan Unmask, avain tulee näkyville.

”Kyllä Moodle on siististi cool” 🙂

Categories
Moodle tekninen Verkko-oppimateriaalit

Five Minutes for Moodle

Good housekeeping requires one to take some time every day to overview our environment, dust off what we still want to use and clear away the trash. Likewise, we should spend some time on a regular basis on the upkeep of our courses in the Moodle learning environment.

Most teachers have only a limited number of courses active at any given time, but that does not mean the other courses under their care should be ignored. In fact, we should be updating and improving our courses while we are not using them instead of during the actual running of the courses. Improving courses while they are on stand by gives us the time to reflect about the best tool for the tasks in the course. Teachers could consider trying something new, like a quiz or a lesson, auto-graded tasks that may help reduce the workload that running the course entails.

In stead of requesting a new copy for each new run of a course, it is more efficient to rename and reset an older version and reuse it. This would help to limit the number of courses on your MyMoodle page as well as the number of of abandoned (“orphaned”) course environments in Moodle. Note that it is possible to import selected course material from one course environment into another, which implies that you could keep one course as a repository of your course materials and draw from that collection for your various running courses.

If a course is really finished and there is no need anymore for either the course or the course materials, please, inform the eLearning Centre and we will recycle the course into a sparkly clean empty environment for new course requests. This is what we will do for any orphaned courses that are not reclaimed by their teachers from our Lost & Found category. Course materials found in said abandoned courses may or may not be saved for future use.

Categories
Muut tekninen

Häiriötiedotteet Facebookissa

Haluatko nopeasti tiedon, jos iLinc-palvelussa on ongelmia tai Moodle on mennyt nurin? Käy sivullamme Facebookissa ja “Tykkää” meistä jo tänään!

Tiedotamme Facebookissa Kemi-Tornion ammattikorkeakoulun sekä Lapin yliopiston etäopetuksen ongelmista, kuten esimerkiksi palvelimen kaatumisista, internet-yhteyden katkeamisesta sekä näiden korjausaikatauluista. Tiedotteet tulevat sivullemme hyvin nopeasti ongelman havaittuamme ja kerromme myös ongelman korjaantumisesta välittömästi 🙂

Categories
eOppimiskeskus Lappia Blog Lappia Wiki Moodle pedagoginen Verkko-oppimateriaalit

Miten saan Moodleen RSS-syötteet?

Ammattitaitoiset opettajat haluavat luonnollisesti pysyä ajan tasalla oman alansa uutisista esimerkiksi lukemalla ammattilehtiä sekä osallistumalla seminaareihin. Nykyään myös sosiaalisessa mediassa oman alan tapahtumien seuraaminen on helppoa; vain muutama minuutti päivässä tai viikossa riittää. Enää ei tarvitse käydä joka sivustolla erikseen etsimässä säännöllisesti uusinta tietoa, sillä RSS-syötteen (Really Simple Syndication) avulla esimerkiksi usean blogin uusimmat merkinnät voidaan vaivattomasti  koota yhteen paikaan.

RSS on siis tiedon ohjailun menetelmä, jonka avulla voidaan tilata omalle tietokoneelle materiaalia sellaisilta sivuilta, joka tarjoaa RSS-syötteen. RSS-syötteitä voi tilata joko suoraan selaimeen tai RSS-lukijaan (RSS Reader), jolla voi käsitellä kerralla useiden sivustojen lähettämiä syötteitä. Yleisimpien selaimien (esim. Internet Explorer, Firefox, Safari) ajantasaisten versioiden perusominaisuuksiin kuuluu syötteen yksinkertainen tilaaminen RSS-painiketta tai -linkkiä klikkaamalla. RSS-syötteen tilauspainike (joko valko-oranssi ikoni tai samanvärinen suorakulmio, jossa kirjaimet RSS) löytyy joko sivun sisällöstä tai selaimen osoitepalkin oikeasta reunasta. Joskus syöte on liitetty tekstilinkkiin, mutta tällöinkin tilaaminen tapahtuu samalla periaatteella kuten tilausikonia ”klikattaessa”. Esimerkkinä RSS-syötteen lukijasta voit puolestaan vilkaista GoogleReaderia tästä.

Opettajien näkökulmasta katsottuna syötteitä voidaan käyttää kätevästi oppimateriaalina. Moodlessa on Ulkoiset RSS-syötteet –lohko, joka lukee RSS-syötteitä ja näyttää niiden sisältävien merkintöjen ja uutisten lohkot. RSS-lohkon asetusikkunassa voit lisätä syötteitä Omien syötteiden hallinta –välilehdeltä. Lisää uutislähteen osoite –kenttään määritellään lisättävän RSS-syötteen osoite, jonka saat klikkaamalla haluamasi sivun RSS-ikonia ja josta voit sen kopioida Uutislähteen osoite –kenttään. Paina lopuksi Lisää –painiketta sivuna alhaalta tallentaaksesi syötteen Moodleen.

Määritä lohkon asetukset –välilehdeltä voit vielä esimerkiksi valita jokaisesta linkistä kuvauksen näkyviin sekä kuinka monta uutista per lohkoa kohden haluat näytettävän. Huomiothan, että kaikki hakemasi RSS-syötteet tallentuvat Moodleen, josta voit klikkaamalla valita ne syötteet, jotka juuri tähän lohkoon/kurssiympäristöön haluat näkyviin.

Käy tästä vielä katsomassa hieno videoklippi, jossa havainnollistetaan, kuinka RSS-syötteet helpottavat meitä uuden tiedon hakemisessa! Lisätietoa RSS-syötteistä löydät myös Sukellus sosisaaliseen mediaan -koulutuksen Lappia wikistä.

Categories
Moodle Muut

Tietokoneet kaikille/Laptops for all

The student laptops for all new students have the potential of improving the quality of education at Lappia AO and Kemi-Tornio UAS if they are employed in the right way by both students and staff. However, they equally have the potential to complicate things in class, particularly, since the teachers have not worked with those laptops themselves and the software in the teacher PCs is not the same as in the student laptops. Having the laptops may create expectations in students that they will be used in every class when that may not be case, depending on the course and the teacher.

For those who have not seen one of those Dell VOSTRO laptop up close, there is a short slideshow available (suomeksi ja englanniksi) that shows the ins and outs of the machine.

If experience is anything to go by, a considerable number of students will encounter problems of one kind or another with their laptop. The IT-support services risk being overburdened with support requests from the over 1500 students who have received a VOSTRO. To stop this from occurring the teachers should direct students who have software or hardware issues that cannot be solved in class to the instruction and help pages at edu.tokem.fi that were opened for this purpose:
http://edu.tokem.fi/?Deptid=15315 (suomeksi)
http://edu.tokem.fi/?Deptid=15330 (English)

Undoubtedly, having the laptops in class will also entail practical issues, such as access to wall power sockets. Students may want to sit near them. Having extension cords handy will be a good idea in certain classrooms. Another item that comes to mind is the fact that all student laptops have Open Office installed and most teacher machines have only Microsoft Office. So long as not all teachers have access to Open Office, students should be instructed to hand in their work in a format that the teachers can open (Usually, MS Office 2003 formats will be the best option).

As for the eLearning Center, we fully expect that the availability of laptops to all new students will lead to an increase in the use of the Moodle learning environment to support classroom courses. With an eye to that, we wish to ask all teachers for two things:

  1. Please, check that you have access to all your courses in Moodle. There is presently a large number of courses in Moodle that have no teachers anymore. The eLearning Center will remove these courses if no teacher shows up for them.
  2. If you have no previous course that you can use, when ordering a new course from the eLearning Center, please state the following information clearly in your message:
    – The full name of the course
    – The student group (or the unit)
    – The number of credits
    – The enrolment key (kurssiavain)
    – Possible other teachers

Thanks to all and let’s work together to make this a successful course year, laptops or no laptops 🙂

Categories
iLinc Moodle pedagoginen tekninen

Aktiivista opiskelua

Opintojaksoissa tuntuu olevan joskus enemmän asiaa kuin etäopetuksen kontaktitunneilla ehditään ”käydä läpi”. Silti olisi oppimistulosten ja opiskelijoiden jaksamisen kannalta tärkeää opiskella myös muuten kuin kuuntelemalla luentoa. Oppiminenhan tapahtuu vuorovaikutuksessa. Syksyllä KTAMK:ssa olleessa Mussutuskampanjassa tuli opiskelijoilta selkeää palautetta: ”ei kiitos pelkkää luentoa”. Sekä iLincissä että Moodlessa on paljon opiskelijaa aktivoivia työkaluja, ryhmätyötilat (iLinc) ja ryhmät (Moodle) ehkä useimmin käytettyinä.

iLincissä myös Chatti ja Palaute (Feedback) ovat nopeita aktivointi- ja herättelykeinoja. Hyvähän se on välillä varmistaa että kuulijat ovat hereillä. Feedbackillä voi kysellä muutakin kuin äänen kuuluvuutta eli vaikkapa ollaanko samaa mieltä, missä ollaan tehtävän teossa menossa, onko väite oikea vai väärä. Ohjeita iLincciin löytyy täältä.

Moodlesta aktivointityökaluja löytyy myös useita, kun napsauttaa muokkaustilan päälle ja klikkaa lohkon Aktiviteetti-alasvetovalikon auki. Moodlen ohjeita löytyy täältä.

Tai miten olisi välillä vaikka aivoriihi tai roolipeli?